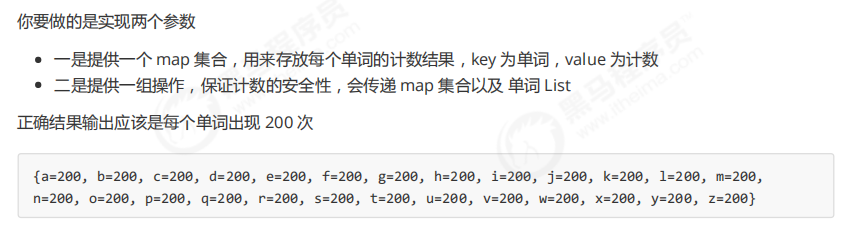
8.1 线程池
1. 自定义线程池

步骤1:自定义拒绝策略接口
package com.example.juc;

import lombok.extern.slf4j.Slf4j;

import java.sql.Connection;
import java.util.ArrayDeque;
import java.util.Deque;
import java.util.concurrent.locks.Condition;
import java.util.concurrent.locks.ReentrantLock;

@Slf4j
public class cn8 {

}

class BlockingQueue<T>{
    //1.任务队列
    private Deque<T> queue = new ArrayDeque<>();
    //2锁
    private ReentrantLock lock =new ReentrantLock();
    //3 . 生产者条件变量
    private Condition fullWaitSet = lock.newCondition();
    //4.消费者条件变量
    private Condition emptyWaitSet = lock.newCondition();
    //5.容量
    private int capacity;

    public BlockingQueue(int capacity){
        this.capacity = capacity;
    }

    //阻塞获取
    public T take(){
        lock.lock();
        try {
            //如果队列是空的
            while (queue.isEmpty()){
                try {
                    //那么我们需要进入消费者条件变量中去等待
                    emptyWaitSet.await();
                } catch (InterruptedException e) {
                    e.printStackTrace();
                }
            }
            //去除元素
            T t = queue.removeFirst();
            //唤醒等待队列的线程,让他们put元素
            fullWaitSet.signal();
            return t;
        }finally {
            lock.unlock();
        }
    }

    //阻塞添加
    public void put(T element){
        lock.lock();
        try {
            //说明队列已经满了
            while (queue.size() == capacity){
                try {
                    fullWaitSet.await();
                } catch (InterruptedException e) {
                    e.printStackTrace();
                }
            }
            queue.addLast(element);
            //唤醒消费者容器,让他们知道不是空了,可以开始获取
            emptyWaitSet.signal();
        }finally {
            lock.unlock();
        }
    }
    //获取大小
    public int size(){
        lock.lock();
        try {
            return queue.size();
        }finally {
            lock.unlock();
        }
    }

}
手写线程池
package com.example.juc;

import javafx.concurrent.Worker;
import lombok.extern.slf4j.Slf4j;

import java.sql.Connection;
import java.util.ArrayDeque;
import java.util.Deque;
import java.util.HashMap;
import java.util.HashSet;
import java.util.concurrent.TimeUnit;
import java.util.concurrent.locks.Condition;
import java.util.concurrent.locks.ReentrantLock;

@Slf4j(topic = "c.TestPool")
public class TestPool {
    public static void main(String[] args) {
        ThreadPool threadPool = new ThreadPool(1,
                1000, TimeUnit.MILLISECONDS, 1, (queue, task)->{
            // 1. 死等
//            queue.put(task);
            // 2) 带超时等待
            queue.offer(task, 1500, TimeUnit.MILLISECONDS);
            // 3) 让调用者放弃任务执行
//            log.debug("放弃{}", task);
            // 4) 让调用者抛出异常
//            throw new RuntimeException("任务执行失败 " + task);
            // 5) 让调用者自己执行任务
            task.run();
        });
        for (int i = 0; i < 4; i++) {
            int j = i;
            threadPool.execute(() -> {
                try {
                    Thread.sleep(1000L);
                } catch (InterruptedException e) {
                    e.printStackTrace();
                }
                log.debug("{}", j);
            });
        }
    }
}

@FunctionalInterface // 拒绝策略
interface RejectPolicy<T> {
    void reject(BlockingQueue<T> queue, T task);
}

@Slf4j(topic = "c.ThreadPool")
class ThreadPool {
    // 任务队列
    private BlockingQueue<Runnable> taskQueue;

    // 线程集合
    private HashSet<Worker> workers = new HashSet<>();

    // 核心线程数
    private int coreSize;

    // 获取任务时的超时时间
    private long timeout;

    private TimeUnit timeUnit;

    private RejectPolicy<Runnable> rejectPolicy;

    // 执行任务
    public void execute(Runnable task) {
        // 当任务数没有超过 coreSize 时,直接交给 worker 对象执行
        // 如果任务数超过 coreSize 时,加入任务队列暂存
        synchronized (workers) {
            if(workers.size() < coreSize) {
                Worker worker = new Worker(task);
                log.debug("新增 worker{}, {}", worker, task);
                workers.add(worker);
                worker.start();
            } else {
//                taskQueue.put(task);
                // 1) 死等
                // 2) 带超时等待
                // 3) 让调用者放弃任务执行
                // 4) 让调用者抛出异常
                // 5) 让调用者自己执行任务
                taskQueue.tryPut(rejectPolicy, task);
            }
        }
    }

    public ThreadPool(int coreSize, long timeout, TimeUnit timeUnit, int queueCapcity, RejectPolicy<Runnable> rejectPolicy) {
        this.coreSize = coreSize;
        this.timeout = timeout;
        this.timeUnit = timeUnit;
        this.taskQueue = new BlockingQueue<>(queueCapcity);
        this.rejectPolicy = rejectPolicy;
    }

    class Worker extends Thread{
        private Runnable task;

        public Worker(Runnable task) {
            this.task = task;
        }

        @Override
        public void run() {
            // 执行任务
            // 1) 当 task 不为空,执行任务
            // 2) 当 task 执行完毕,再接着从任务队列获取任务并执行
//            while(task != null || (task = taskQueue.take()) != null) {
            while(task != null || (task = taskQueue.poll(timeout, timeUnit)) != null) {
                try {
                    log.debug("正在执行...{}", task);
                    task.run();
                } catch (Exception e) {
                    e.printStackTrace();
                } finally {
                    task = null;
                }
            }
            synchronized (workers) {
                log.debug("worker 被移除{}", this);
                workers.remove(this);
            }
        }
    }
}
@Slf4j(topic = "c.BlockingQueue")
class BlockingQueue<T> {
    // 1. 任务队列
    private Deque<T> queue = new ArrayDeque<>();

    // 2. 锁
    private ReentrantLock lock = new ReentrantLock();

    // 3. 生产者条件变量
    private Condition fullWaitSet = lock.newCondition();

    // 4. 消费者条件变量
    private Condition emptyWaitSet = lock.newCondition();

    // 5. 容量
    private int capcity;

    public BlockingQueue(int capcity) {
        this.capcity = capcity;
    }

    // 带超时阻塞获取
    public T poll(long timeout, TimeUnit unit) {
        lock.lock();
        try {
            // 将 timeout 统一转换为 纳秒
            long nanos = unit.toNanos(timeout);
            while (queue.isEmpty()) {
                try {
                    // 返回值是剩余时间
                    if (nanos <= 0) {
                        return null;
                    }
                    nanos = emptyWaitSet.awaitNanos(nanos);
                } catch (InterruptedException e) {
                    e.printStackTrace();
                }
            }
            T t = queue.removeFirst();
            fullWaitSet.signal();
            return t;
        } finally {
            lock.unlock();
        }
    }

    // 阻塞获取
    public T take() {
        lock.lock();
        try {
            while (queue.isEmpty()) {
                try {
                    emptyWaitSet.await();
                } catch (InterruptedException e) {
                    e.printStackTrace();
                }
            }
            T t = queue.removeFirst();
            fullWaitSet.signal();
            return t;
        } finally {
            lock.unlock();
        }
    }

    // 阻塞添加
    public void put(T task) {
        lock.lock();
        try {
            while (queue.size() == capcity) {
                try {
                    log.debug("等待加入任务队列 {} ...", task);
                    fullWaitSet.await();
                } catch (InterruptedException e) {
                    e.printStackTrace();
                }
            }
            log.debug("加入任务队列 {}", task);
            queue.addLast(task);
            emptyWaitSet.signal();
        } finally {
            lock.unlock();
        }
    }

    // 带超时时间阻塞添加
    public boolean offer(T task, long timeout, TimeUnit timeUnit) {
        lock.lock();
        try {
            long nanos = timeUnit.toNanos(timeout);
            while (queue.size() == capcity) {
                try {
                    if(nanos <= 0) {
                        return false;
                    }
                    log.debug("等待加入任务队列 {} ...", task);
                    nanos = fullWaitSet.awaitNanos(nanos);
                } catch (InterruptedException e) {
                    e.printStackTrace();
                }
            }
            log.debug("加入任务队列 {}", task);
            queue.addLast(task);
            emptyWaitSet.signal();
            return true;
        } finally {
            lock.unlock();
        }
    }

    public int size() {
        lock.lock();
        try {
            return queue.size();
        } finally {
            lock.unlock();
        }
    }

    public void tryPut(RejectPolicy<T> rejectPolicy, T task) {
        lock.lock();
        try {
            // 判断队列是否满
            if(queue.size() == capcity) {
                rejectPolicy.reject(this, task);
            } else {  // 有空闲
                log.debug("加入任务队列 {}", task);
                queue.addLast(task);
                emptyWaitSet.signal();
            }
        } finally {
            lock.unlock();
        }
    }
}
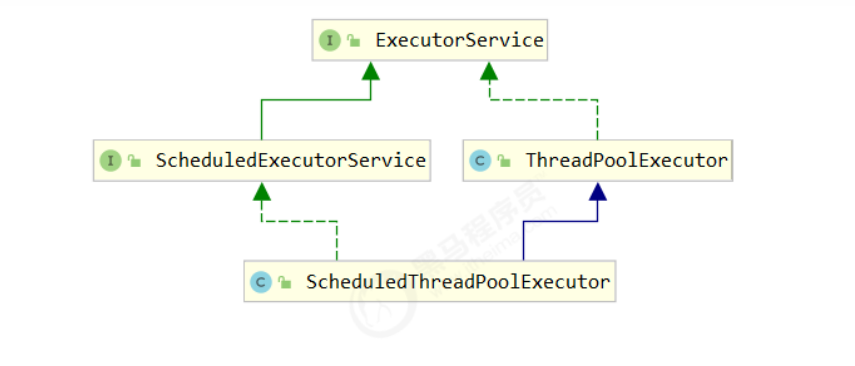
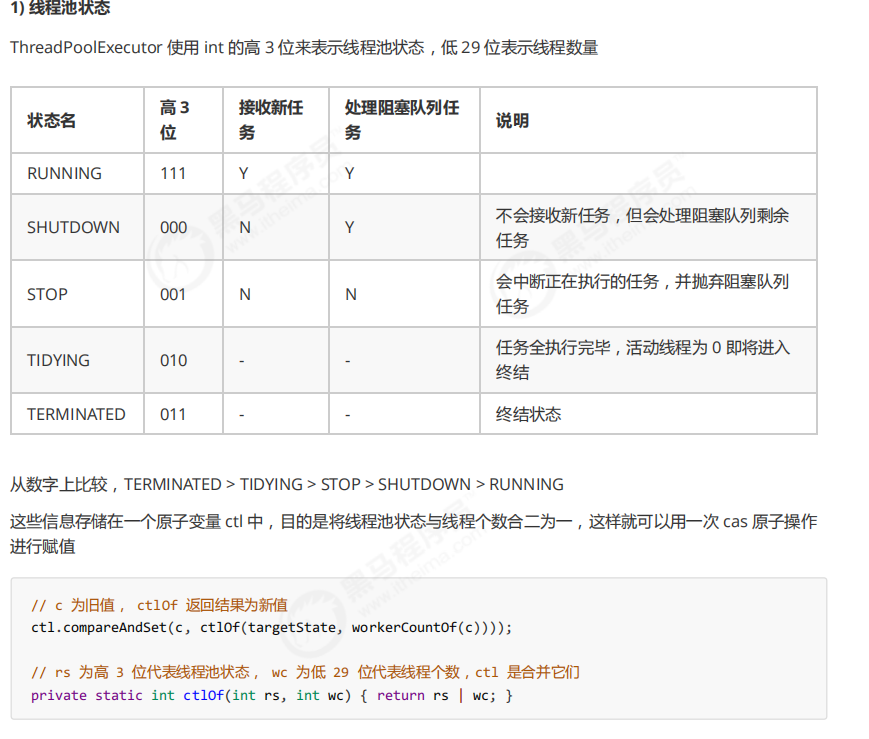
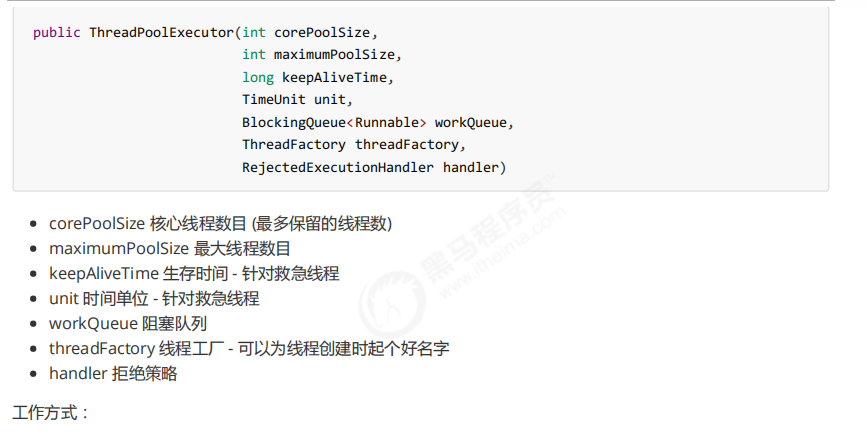
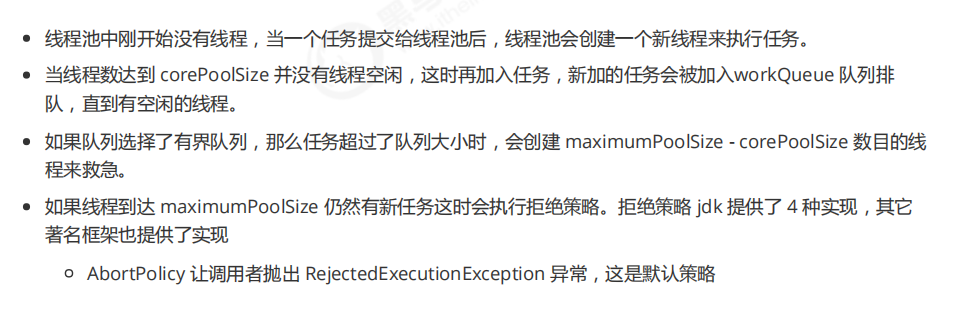
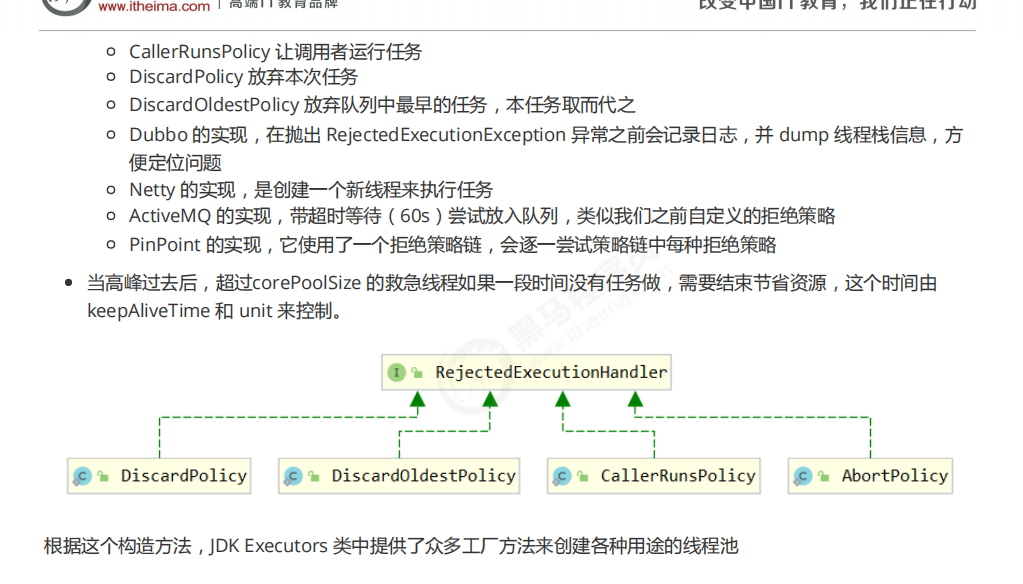
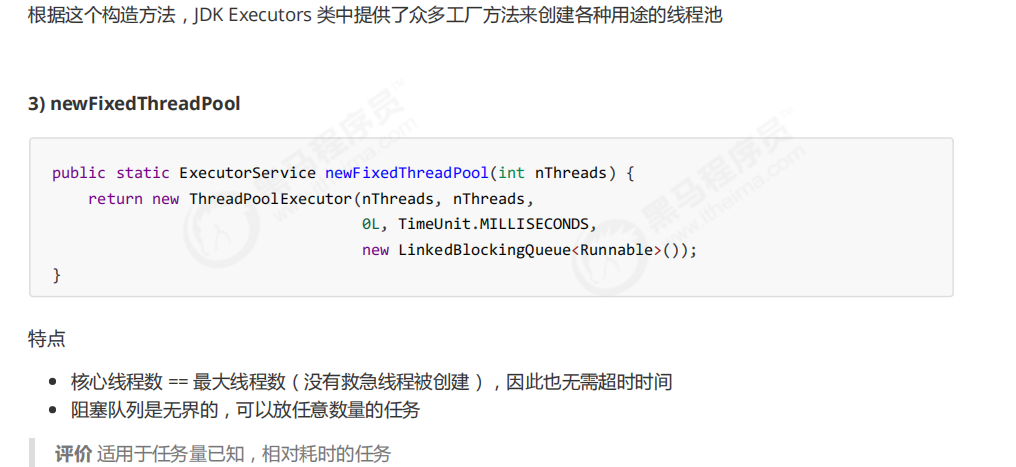
2. ThreadPoolExecutor
2) 构造方法

package com.example.juc.cn8;

import lombok.extern.slf4j.Slf4j;

import java.util.concurrent.Executor;
import java.util.concurrent.ExecutorService;
import java.util.concurrent.Executors;
import java.util.concurrent.ThreadFactory;
import java.util.concurrent.atomic.AtomicInteger;

@Slf4j
public class TestThreadExecturos {
    public static void main(String[] args) {
        ExecutorService executorService = Executors.newFixedThreadPool(2, new ThreadFactory() {
            private  AtomicInteger atomicInteger =new AtomicInteger(1);
            @Override
            public Thread newThread(Runnable r) {
                return new Thread(r,"huihui_pool"+atomicInteger.getAndIncrement());
            }
        });
        executorService.execute(()->{
            log.debug("{1}");
        });
        executorService.execute(()->{
            log.debug("{2}");
        });
        executorService.execute(()->{
            log.debug("{3}");
        });
    }
}


package com.example.juc.cn8;

import lombok.extern.slf4j.Slf4j;

import java.util.concurrent.SynchronousQueue;

@Slf4j
public class NewCachedThreadPool {
    public static void main(String[] args) throws InterruptedException {
        SynchronousQueue<Integer> integers = new SynchronousQueue<>();
        new Thread(() -> {
            try {
                log.debug("putting {} ", 1);
                integers.put(1);
                log.debug("{} putted...", 1);
                log.debug("putting...{} ", 2);
                integers.put(2);
                log.debug("{} putted...", 2);
            } catch (InterruptedException e) {
                e.printStackTrace();
            }
        },"t1").start();
        Thread.sleep(1000);
        new Thread(() -> {
            try {
                log.debug("taking {}", 1);
                integers.take();
            } catch (InterruptedException e) {
                e.printStackTrace();
            }
        },"t2").start();
        Thread.sleep(1000);
        new Thread(() -> {
            try {
                log.debug("taking {}", 2);
                integers.take();
            } catch (InterruptedException e) {
                e.printStackTrace();
            }
        },"t3").start();
    }
}
评价 整个线程池表现为线程数会根据任务量不断增长,没有上限,当任务执行完毕,空闲 1分钟后释放线
程。 适合任务数比较密集,但每个任务执行时间较短的情况
使用场景:
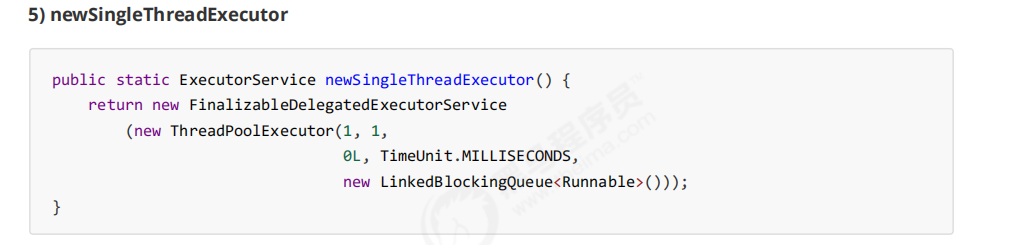
希望多个任务排队执行。线程数固定为 1,任务数多于 1 时,会放入无界队列排队。任务执行完毕,这唯一的线程
也不会被释放。
区别:
自己创建一个单线程串行执行任务,如果任务执行失败而终止那么没有任何补救措施,而线程池还会新建一
个线程,保证池的正常工作
Executors.newSingleThreadExecutor() 线程个数始终为1,不能修改
FinalizableDelegatedExecutorService 应用的是装饰器模式,只对外暴露了 ExecutorService 接口,因
此不能调用 ThreadPoolExecutor 中特有的方法
Executors.newFixedThreadPool(1) 初始时为1,以后还可以修改
对外暴露的是 ThreadPoolExecutor 对象,可以强转后调用 setCorePoolSize 等方法进行修改
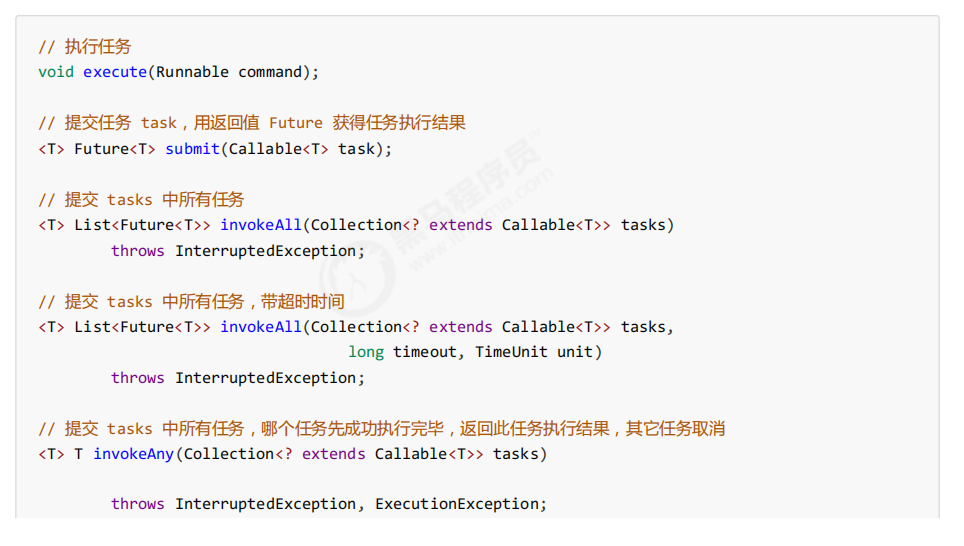
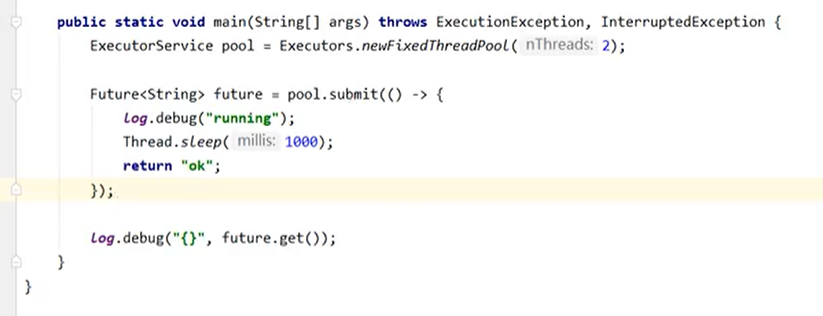
6) 提交任务

8) 任务调度线程池
在『任务调度线程池』功能加入之前,可以使用 java.util.Timer 来实现定时功能,Timer 的优点在于简单易用,但
由于所有任务都是由同一个线程来调度,因此所有任务都是串行执行的,同一时间只能有一个任务在执行,前一个
任务的延迟或异常都将会影响到之后的任务
public static void main(String[] args) {
 Timer timer = new Timer();
 TimerTask task1 = new TimerTask() {
 @Override
 public void run() {
 log.debug("task 1");
 sleep(2);
}
 };
 TimerTask task2 = new TimerTask() {
 @Override
 public void run() {
 log.debug("task 2");
 }
 };
 // 使用 timer 添加两个任务,希望它们都在 1s 后执行
 // 但由于 timer 内只有一个线程来顺序执行队列中的任务,因此『任务1』的延时,影响了『任务2』的执行
 timer.schedule(task1, 1000);
 timer.schedule(task2, 1000);
}
使用 ScheduledExecutorService 改写:
ScheduledExecutorService executor = Executors.newScheduledThreadPool(2);
// 添加两个任务,希望它们都在 1s 后执行
executor.schedule(() -> {
 System.out.println("任务1,执行时间:" + new Date());
 try { Thread.sleep(2000); } catch (InterruptedException e) { }
}, 1000, TimeUnit.MILLISECONDS);
executor.schedule(() -> {
 System.out.println("任务2,执行时间:" + new Date());
}, 1000, TimeUnit.MILLISECONDS);
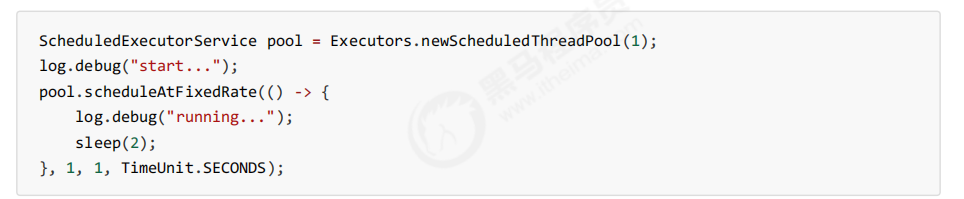
scheduleAtFixedRate 例子:
ScheduledExecutorService pool = Executors.newScheduledThreadPool(1);
log.debug("start...");
pool.scheduleAtFixedRate(() -> {
 log.debug("running...");
}, 1, 1, TimeUnit.SECONDS);
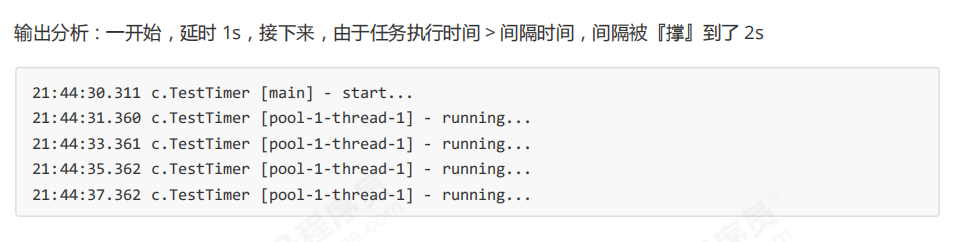
scheduleAtFixedRate 例子(任务执行时间超过了间隔时间):
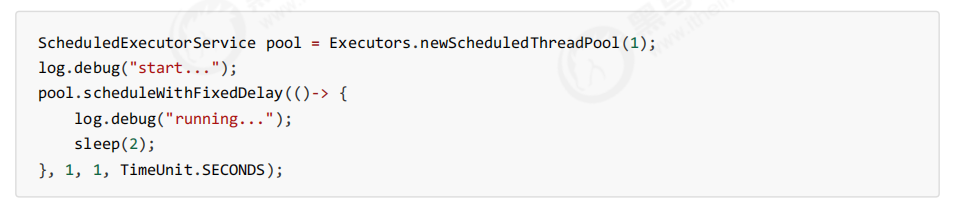
scheduleWithFixedDelay 例子:
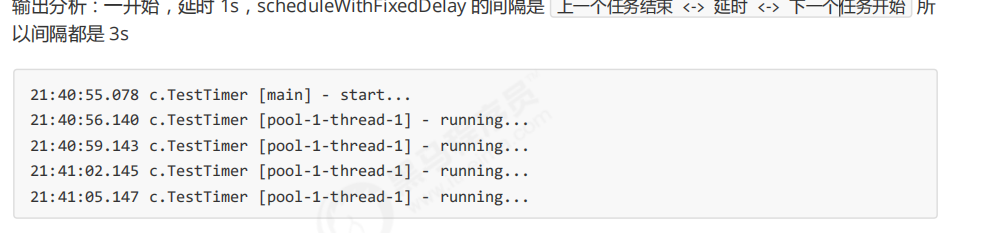
输出分析:一开始,延时 1s,scheduleWithFixedDelay 的间隔是 上一个任务结束 <-> 延时 <-> 下一个任务开始 所
以间隔都是 3s
程也不会被释放。用来执行延迟或反复执行的任务
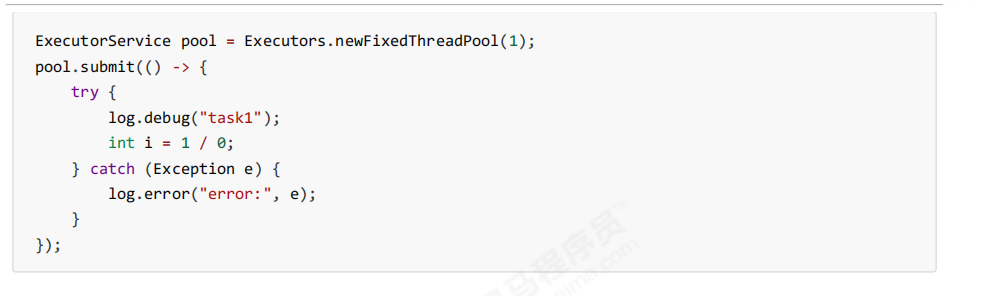
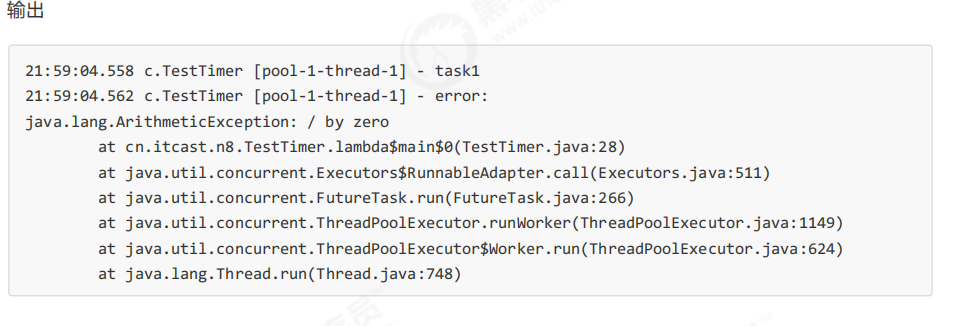
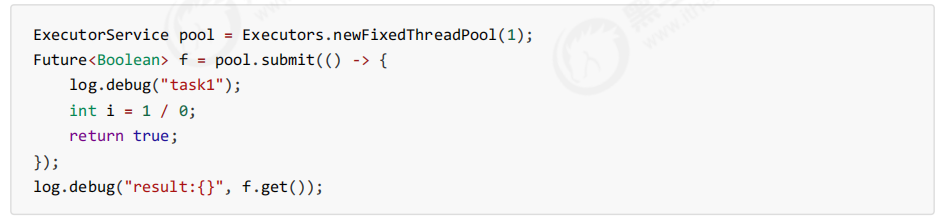
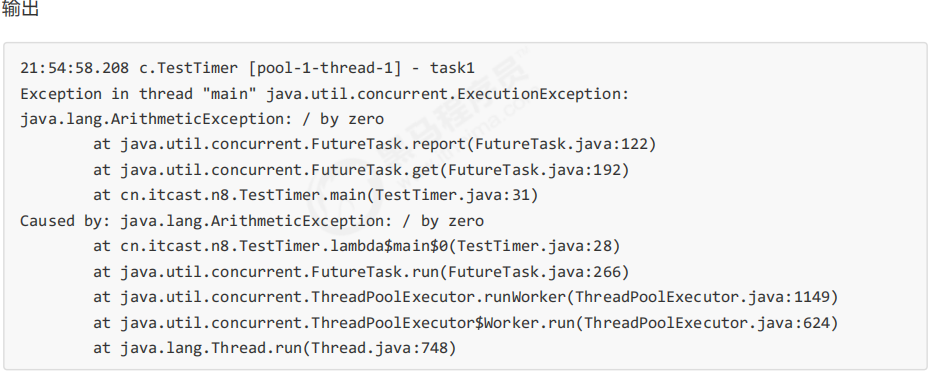
9) 正确处理执行任务异常
方法1:主动捉异常
方法2:使用 Future
定时
1. 定期执行
如何让每周四 18:00:00 定时执行任务?


10) Tomcat 线程池
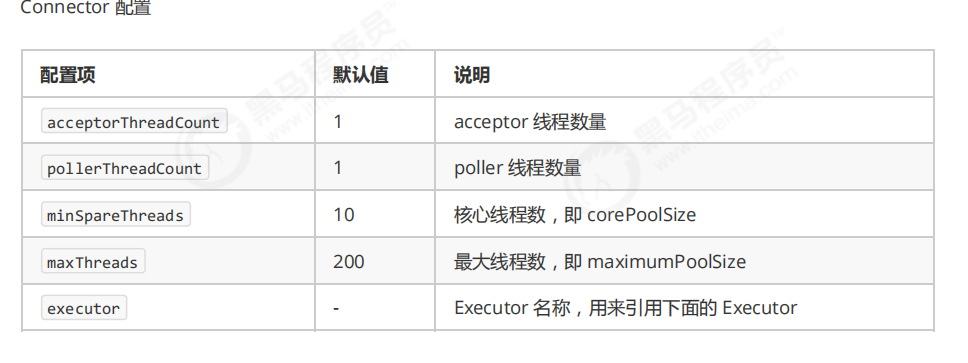
Tomcat 在哪里用到了线程池呢
LimitLatch 用来限流,可以控制最大连接个数,类似 J.U.C 中的 Semaphore 后面再讲
Acceptor 只负责【接收新的 socket 连接】
Poller 只负责监听 socket channel 是否有【可读的 I/O 事件】
一旦可读,封装一个任务对象(socketProcessor),提交给 Executor 线程池处理
Executor 线程池中的工作线程最终负责【处理请求】
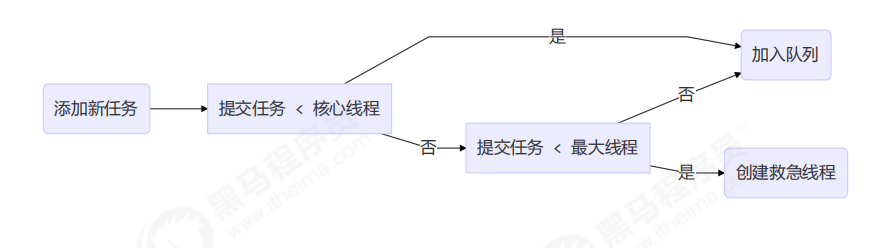
Tomcat 线程池扩展了 ThreadPoolExecutor,行为稍有不同
如果总线程数达到 maximumPoolSize
这时不会立刻抛 RejectedExecutionException 异常
而是再次尝试将任务放入队列,如果还失败,才抛出 RejectedExecutionException 异常
源码 tomcat-7.0.42
public void execute(Runnable command, long timeout, TimeUnit unit) {
 submittedCount.incrementAndGet();
 try {
 super.execute(command);
 } catch (RejectedExecutionException rx) {
 if (super.getQueue() instanceof TaskQueue) {
 final TaskQueue queue = (TaskQueue)super.getQueue();
 try {
 if (!queue.force(command, timeout, unit)) {
 submittedCount.decrementAndGet();
 throw new RejectedExecutionException("Queue capacity is full.");
 }
 } catch (InterruptedException x) {
 submittedCount.decrementAndGet();
 Thread.interrupted();
 throw new RejectedExecutionException(x);
 }
} else {
 submittedCount.decrementAndGet();
 throw rx;
 }
 }
}
TaskQueue.java
public boolean force(Runnable o, long timeout, TimeUnit unit) throws InterruptedException {
 if ( parent.isShutdown() )
 throw new RejectedExecutionException(
 "Executor not running, can't force a command into the queue"
 );
 return super.offer(o,timeout,unit); //forces the item onto the queue, to be used if the task
is rejected
}
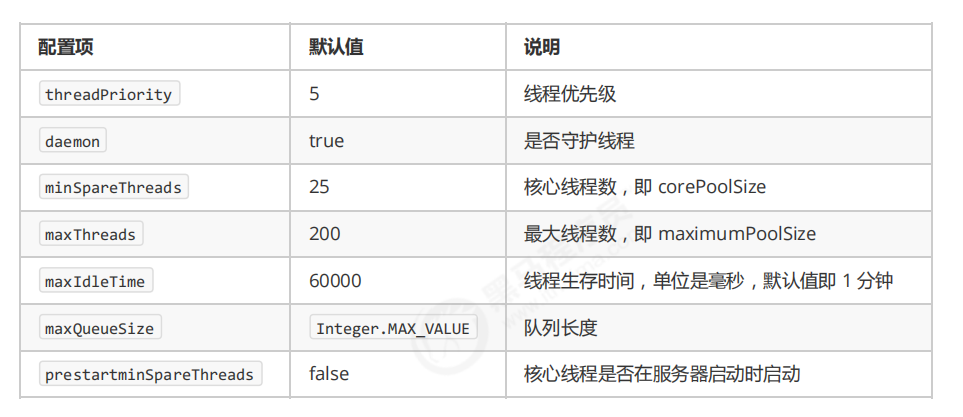
Executor 线程配置
3. Fork/Join
1) 概念
Fork/Join 是 JDK 1.7 加入的新的线程池实现,它体现的是一种分治思想,适用于能够进行任务拆分的 cpu 密集型
运算
所谓的任务拆分,是将一个大任务拆分为算法上相同的小任务,直至不能拆分可以直接求解。跟递归相关的一些计
算,如归并排序、斐波那契数列、都可以用分治思想进行求解
Fork/Join 在分治的基础上加入了多线程,可以把每个任务的分解和合并交给不同的线程来完成,进一步提升了运
算效率
Fork/Join 默认会创建与 cpu 核心数大小相同的线程池
2) 使用
提交给 Fork/Join 线程池的任务需要继承 RecursiveTask(有返回值)或 RecursiveAction(没有返回值),例如下
面定义了一个对 1~n 之间的整数求和的任务
package com.example.juc.cn8;
import lombok.extern.slf4j.Slf4j;
import java.util.concurrent.ForkJoinPool;
import java.util.concurrent.RecursiveTask;
@Slf4j
public class TestForkJoin {
public static void main(String[] args) {
ForkJoinPool forkJoinPool = new ForkJoinPool(4); //如果不指定参数,那么默认是我们的cpu线程数
System.out.println(forkJoinPool.invoke(new MyTask(5)));
}
}
//1~n之间数字的和
@Slf4j
class MyTask extends RecursiveTask<Integer>{
private int n;
public MyTask(int n) {
this.n = n;
}
@Override
public String toString() {
return "MyTask{" +
"n=" + n +
'}';
}
@Override
protected Integer compute() {
//终止条件,分治
if (n == 1) {
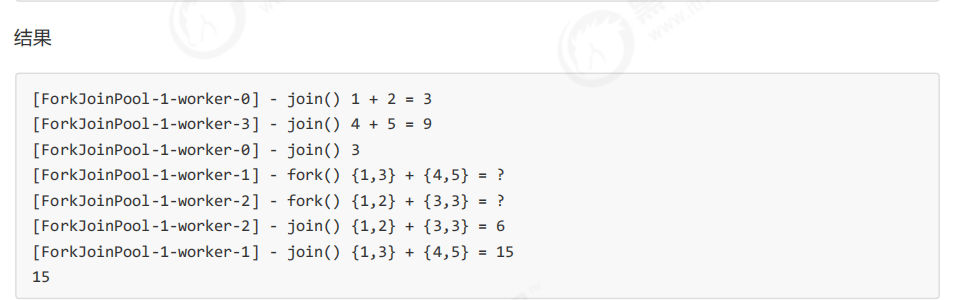
log.debug("join(){}",n);
return 1;
}
MyTask myTask = new MyTask(n - 1);
myTask.fork();//让一个线程去执行此任务
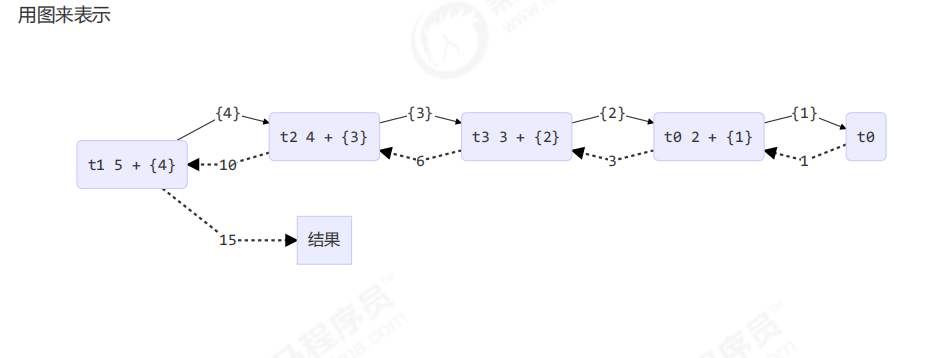
log.debug("fork(){} + {}",n,myTask);
//合并结果
int result = n + myTask.join();
log.debug("join(){} + {} = {}",n,myTask,result);
return result;
}
}
改进
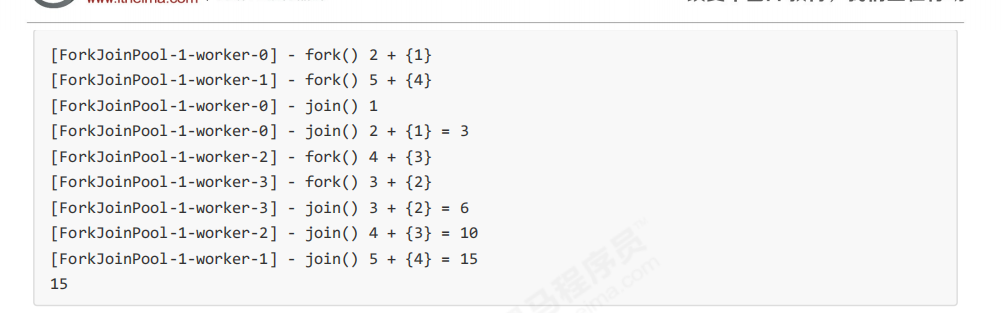
class AddTask3 extends RecursiveTask<Integer> {
int begin;
int end;
public AddTask3(int begin, int end) {
this.begin = begin;
this.end = end;
}
@Override
public String toString() {
return "{" + begin + "," + end + '}';
}
@Override
protected Integer compute() {
// 5, 5
if (begin == end) {
log.debug("join() {}", begin);
return begin;
}
// 4, 5
if (end - begin == 1) {
log.debug("join() {} + {} = {}", begin, end, end + begin);
return end + begin;
}
// 1 5
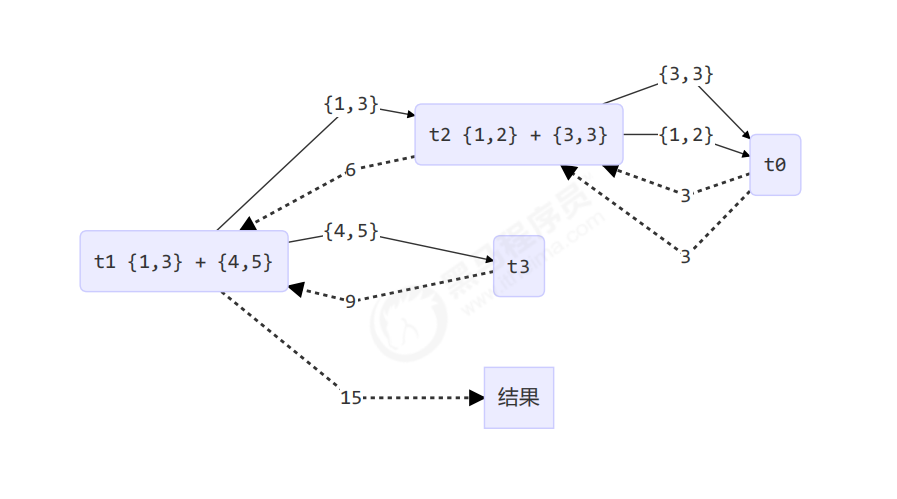
int mid = (end + begin) / 2; // 3
AddTask3 t1 = new AddTask3(begin, mid); // 1,3
t1.fork();
AddTask3 t2 = new AddTask3(mid + 1, end); // 4,5
t2.fork();
log.debug("fork() {} + {} = ?", t1, t2);
int result = t1.join() + t2.join();
log.debug("join() {} + {} = {}", t1, t2, result);
return result;
}
}然后提交给 ForkJoinPool 来执行

AQS 原理
1. 概述
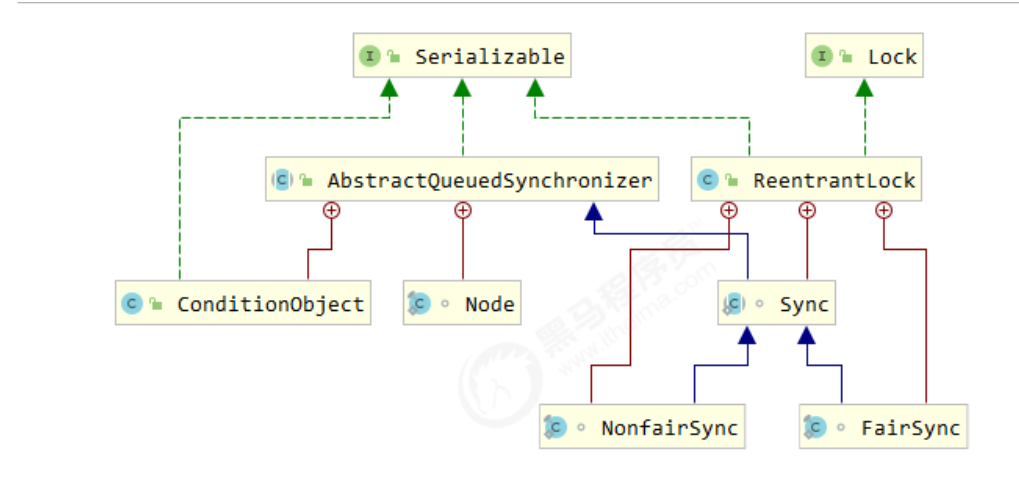
全称是 AbstractQueuedSynchronizer,是阻塞式锁和相关的同步器工具的框架
特点:
用 state 属性来表示资源的状态(分独占模式和共享模式),子类需要定义如何维护这个状态,控制如何获取
锁和释放锁
getState – 获取 state 状态
setState – 设置 state 状态
compareAndSetState – cas 机制设置 state 状态
独占模式是只有一个线程能够访问资源,而共享模式可以允许多个线程访问资源
提供了基于 FIFO 的等待队列,类似于 Monitor 的 EntryList
条件变量来实现等待、唤醒机制,支持多个条件变量,类似于 Monitor 的 WaitSet
子类主要实现这样一些方法(默认抛出 UnsupportedOperationException)
tryAcquire
tryRelease
tryAcquireShared
tryReleaseShared
isHeldExclusively
2. 实现不可重入锁
自定义同步器
package com.example.juc.cn8;

import lombok.extern.slf4j.Slf4j;

import java.util.concurrent.TimeUnit;
import java.util.concurrent.locks.AbstractQueuedSynchronizer;
import java.util.concurrent.locks.Condition;
import java.util.concurrent.locks.Lock;

@Slf4j
public class TestAqs {
    public static void main(String[] args) {
        MyLock myLock = new MyLock();
        new Thread(()->{
//            myLock.lock();
//            log.debug("locking....");
            myLock.lock();
            log.debug("locking....");
            try {
            log.debug("locking....");
                try {
                    Thread.sleep(1000);
                } catch (InterruptedException e) {
                    e.printStackTrace();
                }
            }finally {
                log.debug("unlocking...");
                myLock.unlock();
            }
        },"t1").start();
        new Thread(()->{
            myLock.lock();
            try {
                log.debug("locking....");
                try {
                    Thread.sleep(1000);
                } catch (InterruptedException e) {
                    e.printStackTrace();
                }
            }finally {
                log.debug("unlocking...");
                myLock.unlock();
            }
        },"t2").start();
    }
}

//自定义锁(不可冲入锁)
// 自定义锁(不可重入锁)
class MyLock implements Lock {

    // 独占锁  同步器类
    class MySync extends AbstractQueuedSynchronizer {
        @Override
        protected boolean tryAcquire(int arg) {
            if(compareAndSetState(0, 1)) {
                // 加上了锁,并设置 owner 为当前线程
                setExclusiveOwnerThread(Thread.currentThread());
                return true;
            }
            return false;
        }

        @Override
        protected boolean tryRelease(int arg) {
            setExclusiveOwnerThread(null);
            setState(0);
            return true;
        }

        @Override // 是否持有独占锁
        protected boolean isHeldExclusively() {
            return getState() == 1;
        }

        public Condition newCondition() {
            return new ConditionObject();
        }
    }

    private MySync sync = new MySync();

    @Override // 加锁(不成功会进入等待队列)
    public void lock() {
        sync.acquire(1);
    }

    @Override // 加锁,可打断
    public void lockInterruptibly() throws InterruptedException {
        sync.acquireInterruptibly(1);
    }

    @Override // 尝试加锁(一次)
    public boolean tryLock() {
        return sync.tryAcquire(1);
    }

    @Override // 尝试加锁,带超时
    public boolean tryLock(long time, TimeUnit unit) throws InterruptedException {
        return sync.tryAcquireNanos(1, unit.toNanos(time));
    }

    @Override // 解锁
    public void unlock() {
        sync.release(1);
    }

    @Override // 创建条件变量
    public Condition newCondition() {
        return sync.newCondition();
    }
}


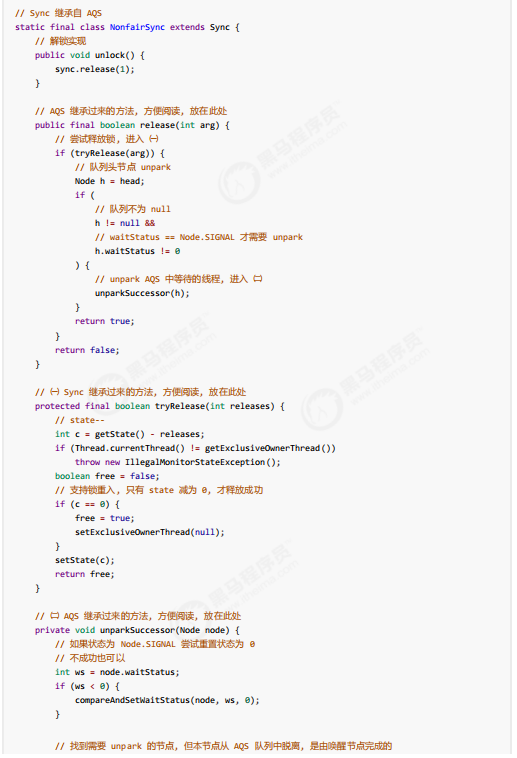
ReentrantLock 原理
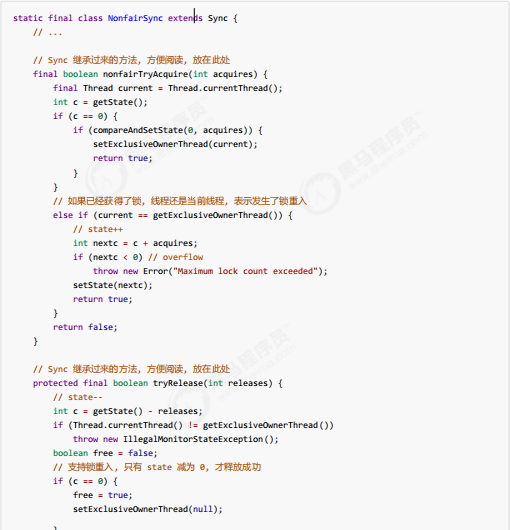
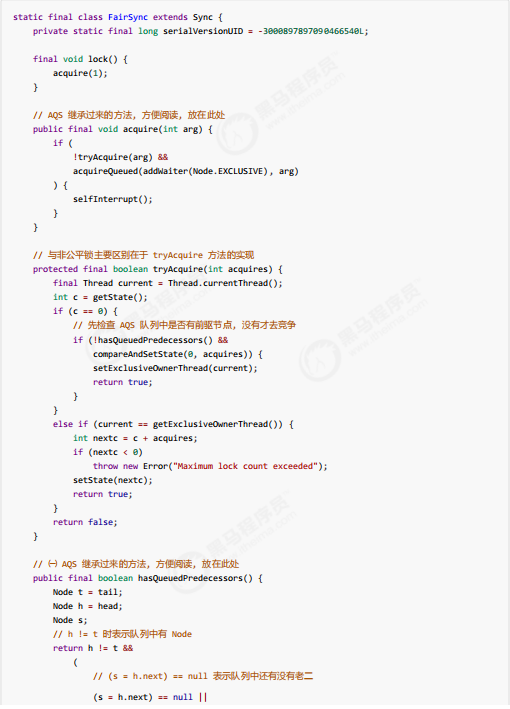
1. 非公平锁实现原理
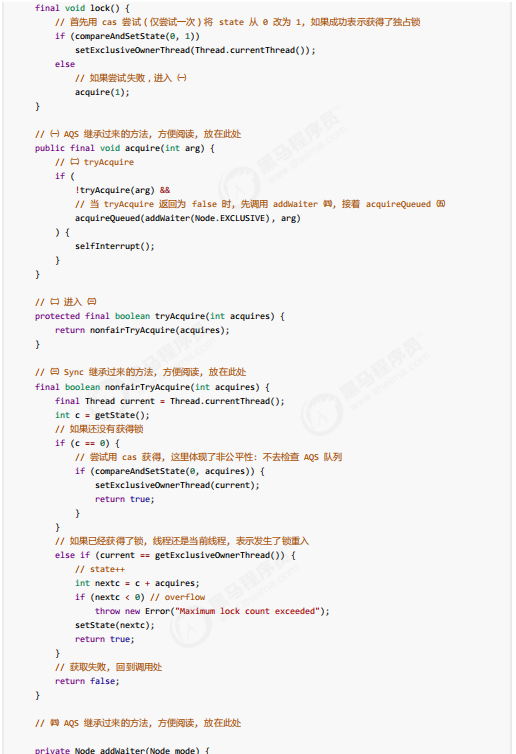
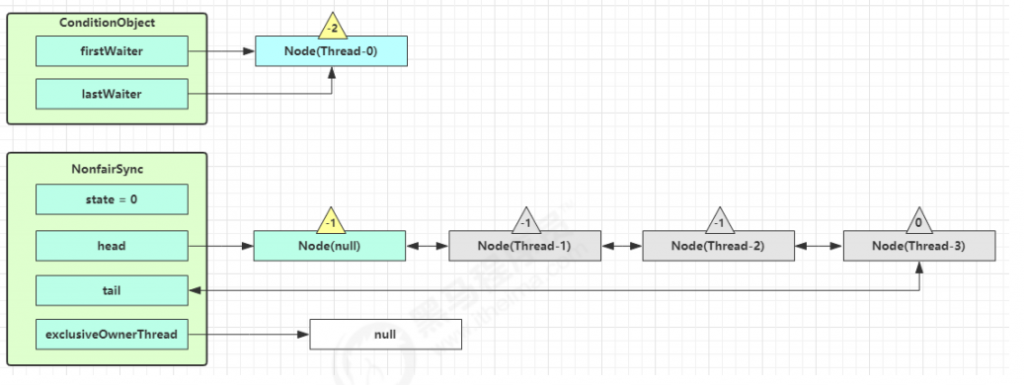
加锁解锁流程
先从构造器开始看,默认为非公平锁实现

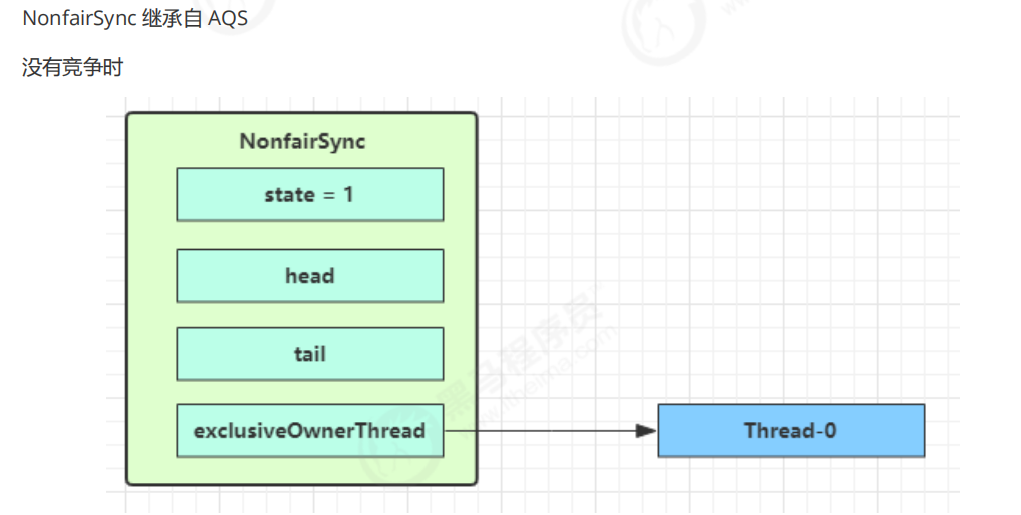
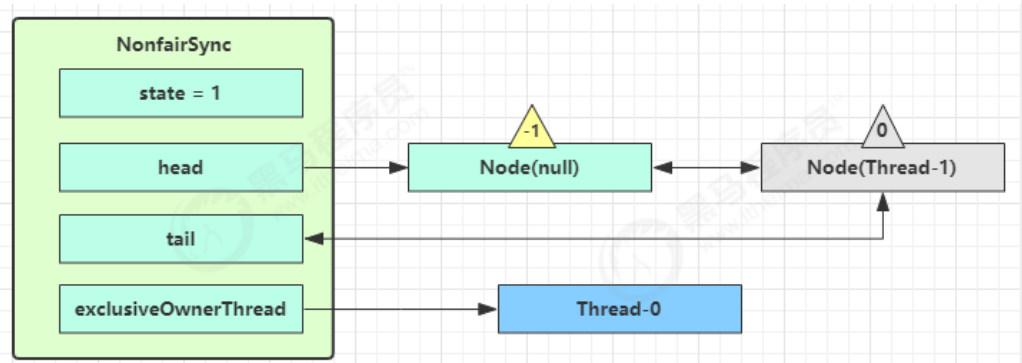
第一个竞争出现时
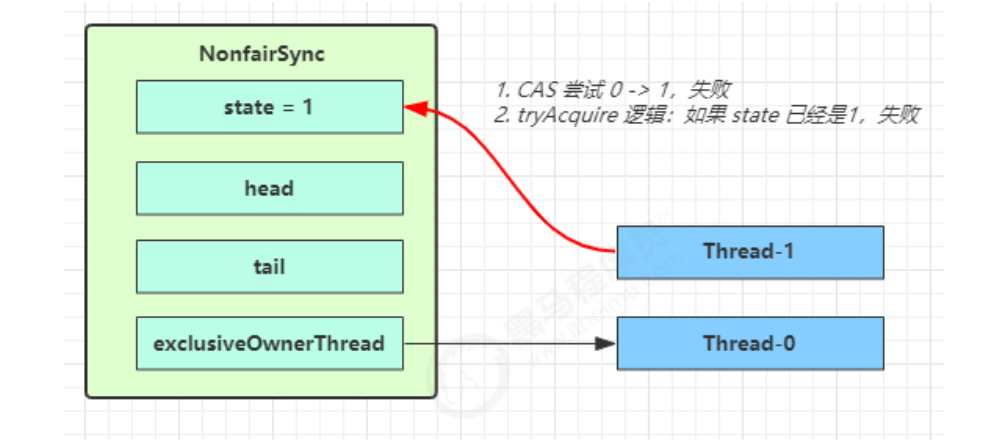
Thread-1 执行了
1. CAS 尝试将 state 由 0 改为 1,结果失败
2. 进入 tryAcquire 逻辑,这时 state 已经是1,结果仍然失败
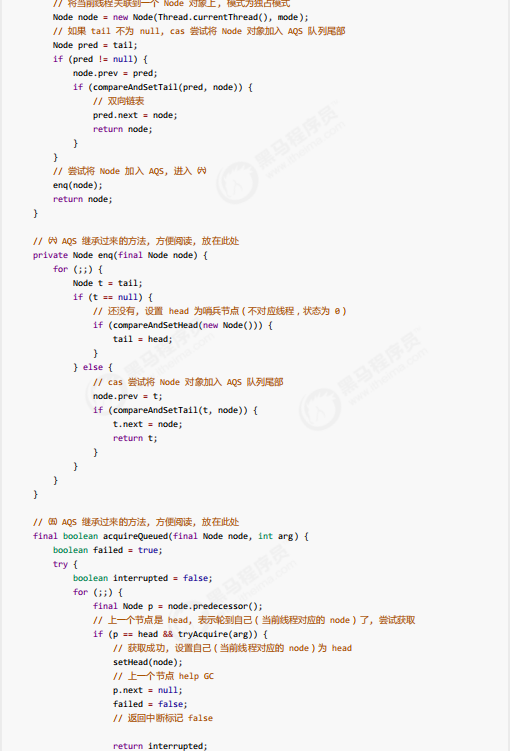
3. 接下来进入 addWaiter 逻辑,构造 Node 队列
图中黄色三角表示该 Node 的 waitStatus 状态,其中 0 为默认正常状态
Node 的创建是懒惰的
其中第一个 Node 称为 Dummy(哑元)或哨兵,用来占位,并不关联线程
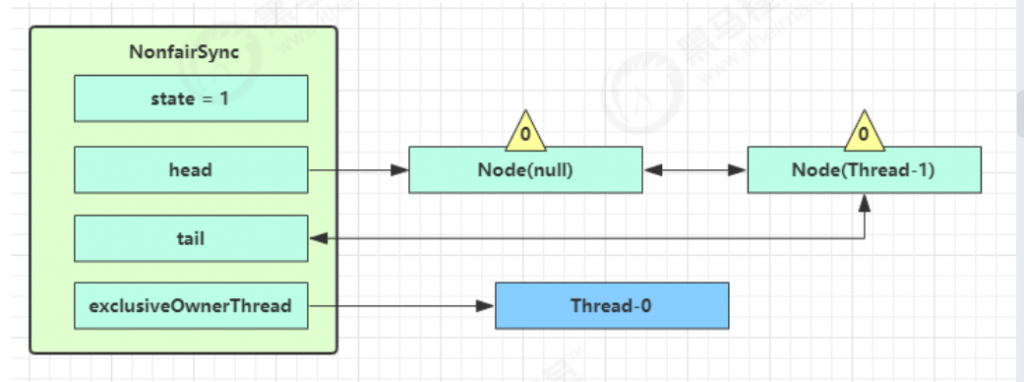
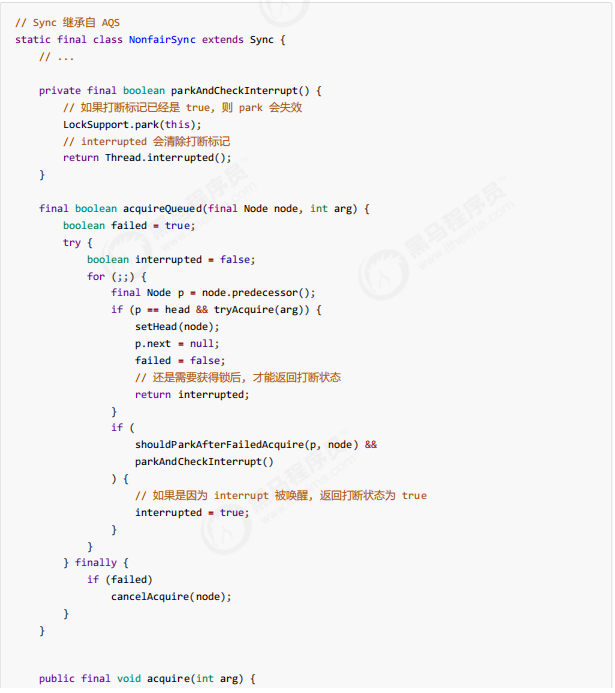
当前线程进入 acquireQueued 逻辑
1. acquireQueued 会在一个死循环中不断尝试获得锁,失败后进入 park 阻塞
2. 如果自己是紧邻着 head(排第二位),那么再次 tryAcquire 尝试获取锁,当然这时 state 仍为 1,失败
3. 进入 shouldParkAfterFailedAcquire 逻辑,将前驱 node,即 head 的 waitStatus 改为 -1,这次返回 false
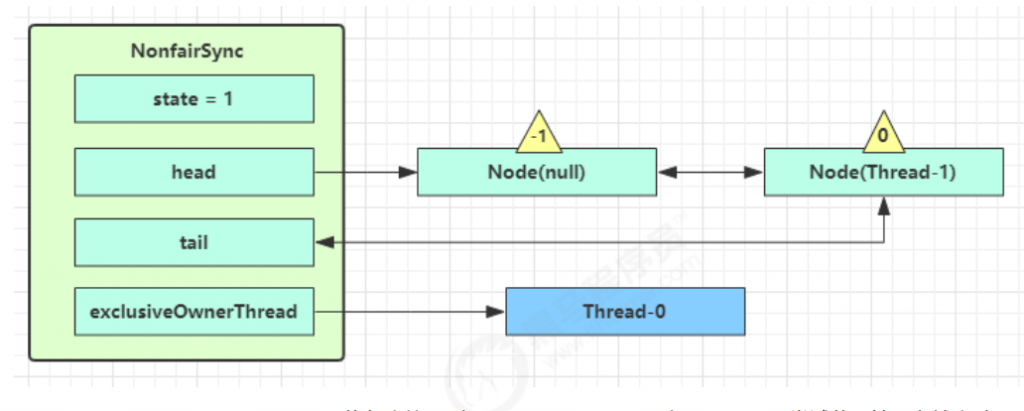
4. shouldParkAfterFailedAcquire 执行完毕回到 acquireQueued ,再次 tryAcquire 尝试获取锁,当然这时
state 仍为 1,失败
5. 当再次进入 shouldParkAfterFailedAcquire 时,这时因为其前驱 node 的 waitStatus 已经是 -1,这次返回
true
6. 进入 parkAndCheckInterrupt, Thread-1 park(灰色表示)
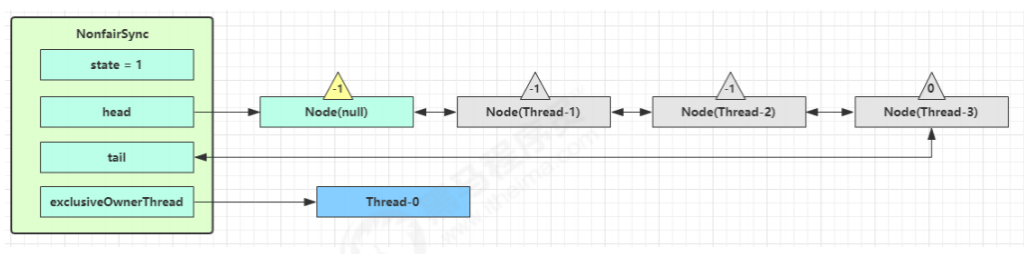
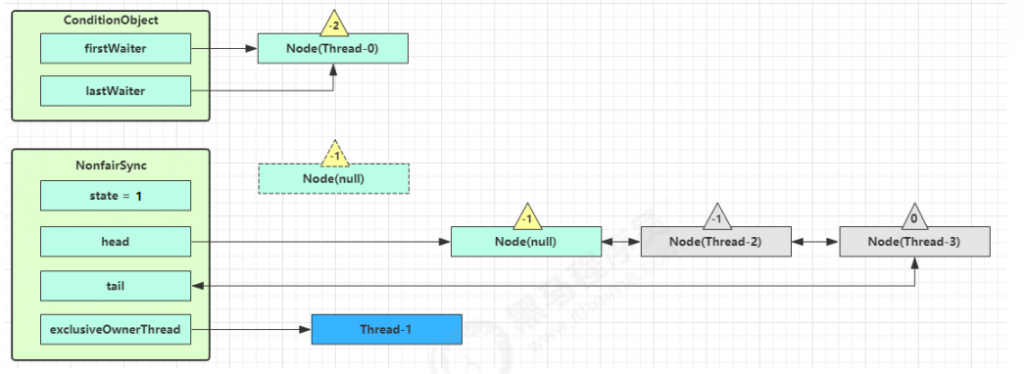
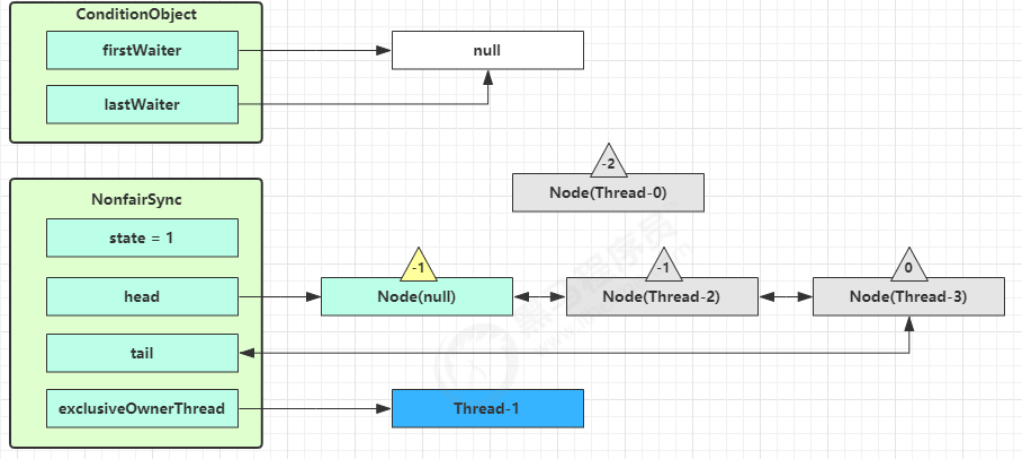
再次有多个线程经历上述过程竞争失败,变成这个样子
Thread-0 释放锁,进入 tryRelease 流程,如果成功
设置 exclusiveOwnerThread 为 null
state = 0
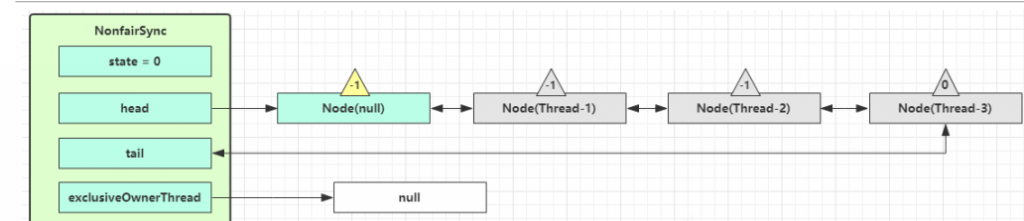
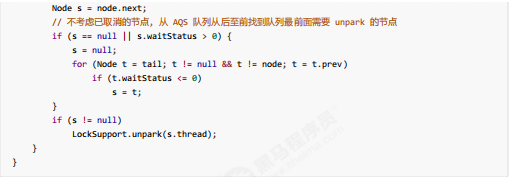
当前队列不为 null,并且 head 的 waitStatus = -1,进入 unparkSuccessor 流程
找到队列中离 head 最近的一个 Node(没取消的),unpark 恢复其运行,本例中即为 Thread-1
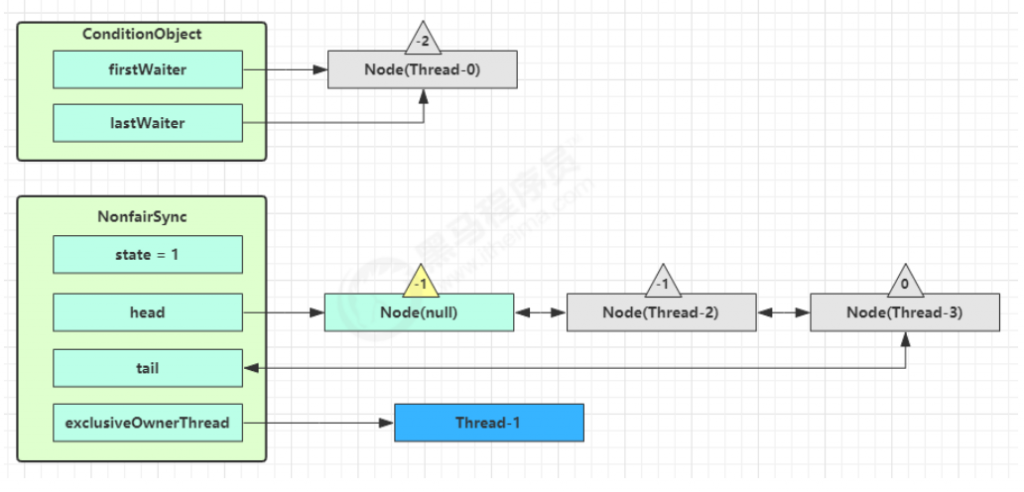
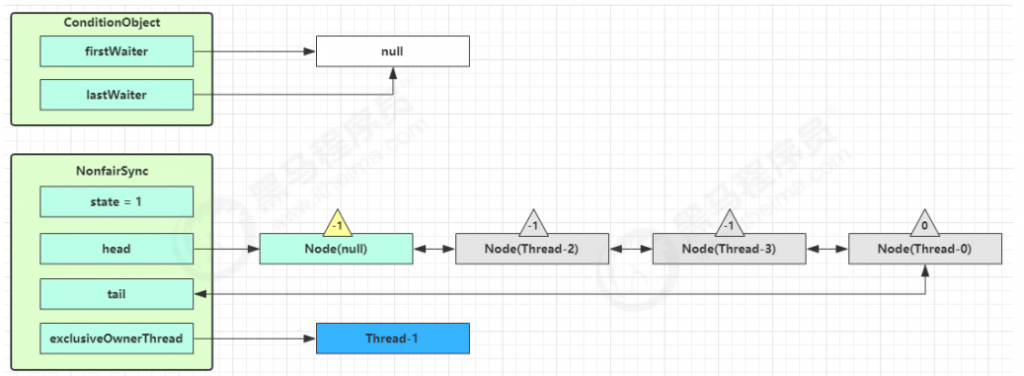
回到 Thread-1 的 acquireQueued 流程
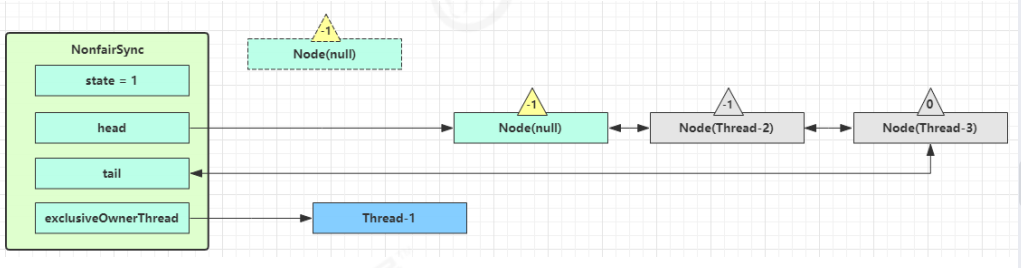
如果加锁成功(没有竞争),会设置
exclusiveOwnerThread 为 Thread-1,state = 1
head 指向刚刚 Thread-1 所在的 Node,该 Node 清空 Thread
原本的 head 因为从链表断开,而可被垃圾回收
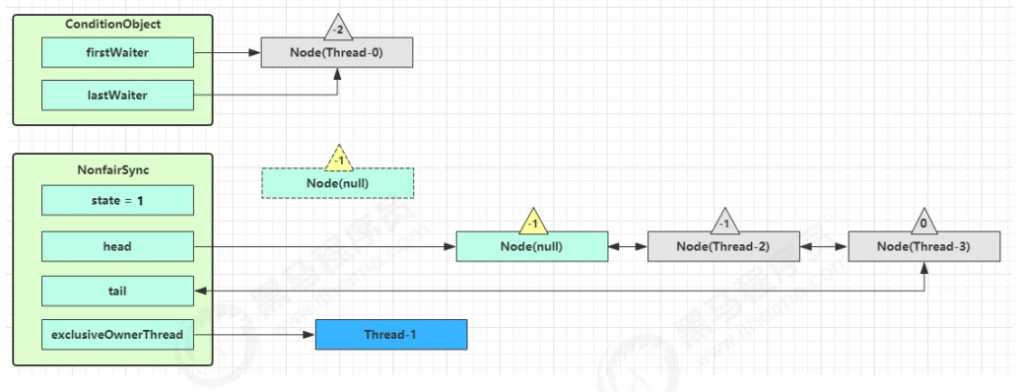
如果这时候有其它线程来竞争(非公平的体现),例如这时有 Thread-4 来了
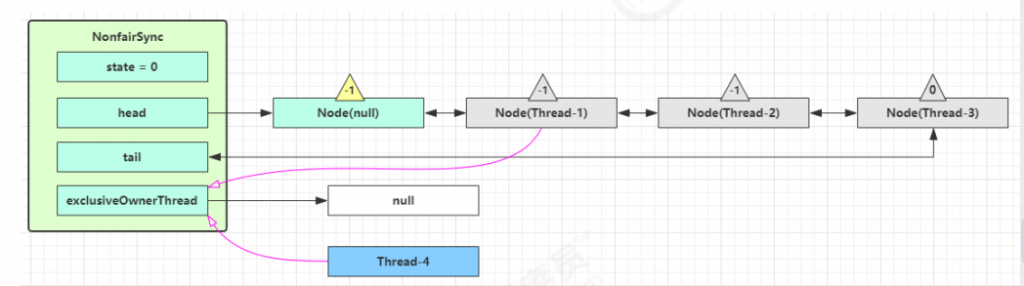
如果不巧又被 Thread-4 占了先
Thread-4 被设置为 exclusiveOwnerThread,state = 1
Thread-1 再次进入 acquireQueued 流程,获取锁失败,重新进入 park 阻塞
加锁源码

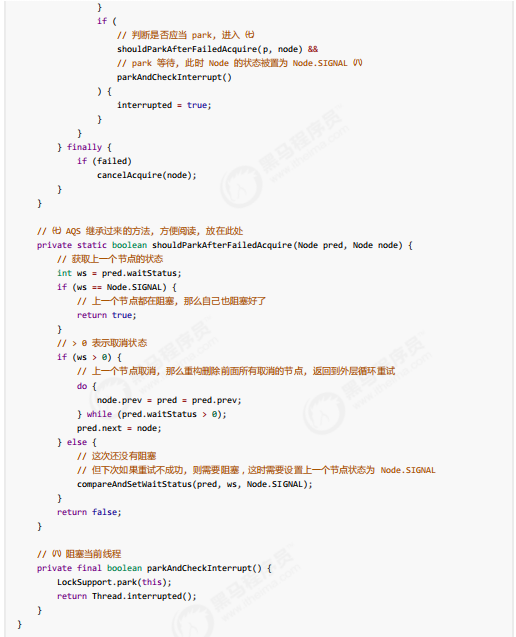
是否需要 unpark 是由当前节点的前驱节点的 waitStatus == Node.SIGNAL 来决定,而不是本节点的
waitStatus 决定
2. 可重入原理

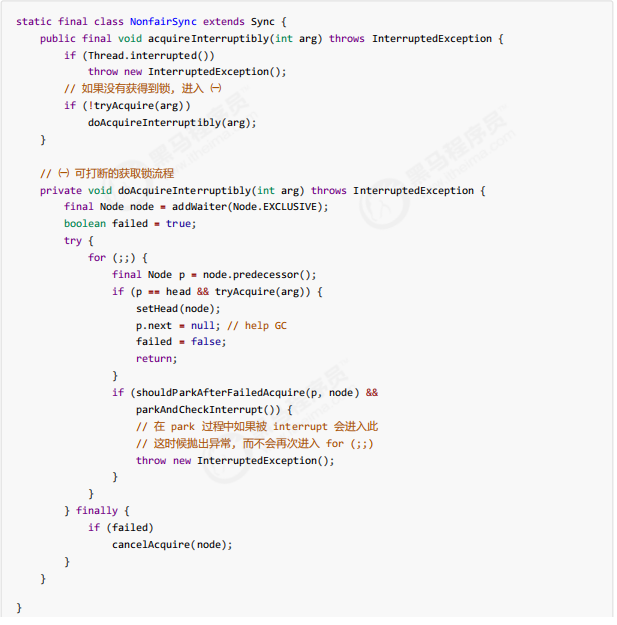
3. 可打断原理
不可打断模式
在此模式下,即使它被打断,仍会驻留在 AQS 队列中,一直要等到获得锁后方能得知自己被打断了
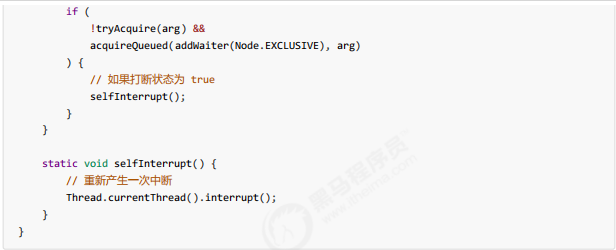
可打断模式
4. 公平锁实现原理

5. 条件变量实现原理
每个条件变量其实就对应着一个等待队列,其实现类是 ConditionObject
await 流程
开始 Thread-0 持有锁,调用 await,进入 ConditionObject 的 addConditionWaiter 流程
创建新的 Node 状态为 -2(Node.CONDITION),关联 Thread-0,加入等待队列尾部
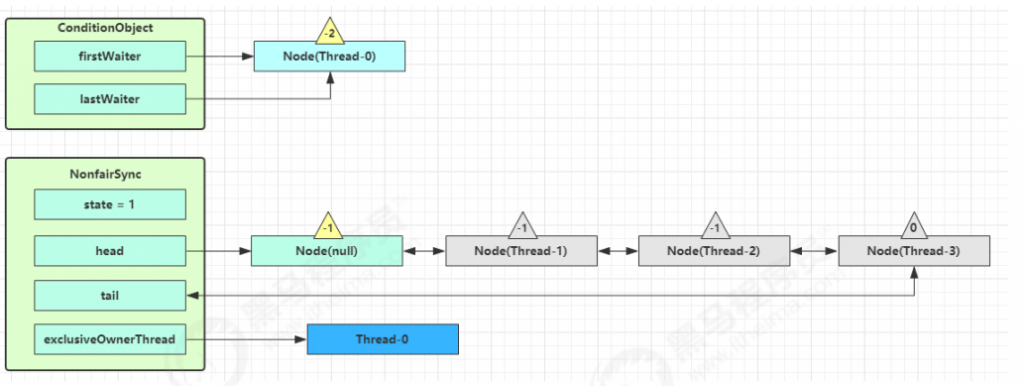
接下来进入 AQS 的 fullyRelease 流程,释放同步器上的锁
unpark AQS 队列中的下一个节点,竞争锁,假设没有其他竞争线程,那么 Thread-1 竞争成功
park 阻塞 Thread-0
signal 流程
假设 Thread-1 要来唤醒 Thread-0
执行 transferForSignal 流程,将该 Node 加入 AQS 队列尾部,将 Thread-0 的 waitStatus 改为 0,Thread-3 的
waitStatus 改为 -1
Thread-1 释放锁,进入 unlock 流程,略
3. 读写锁
3.1 ReentrantReadWriteLock
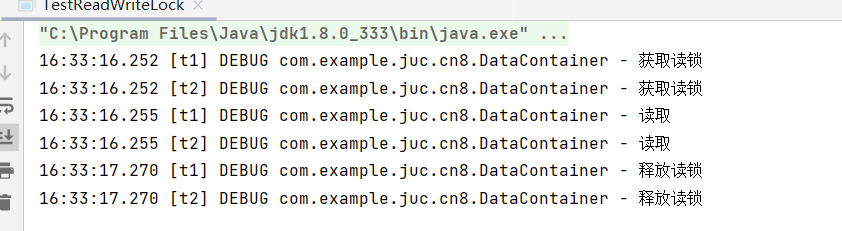
当读操作远远高于写操作时,这时候使用 读写锁 让 读-读 可以并发,提高性能。 类似于数据库中的 select …
from … lock in share mode
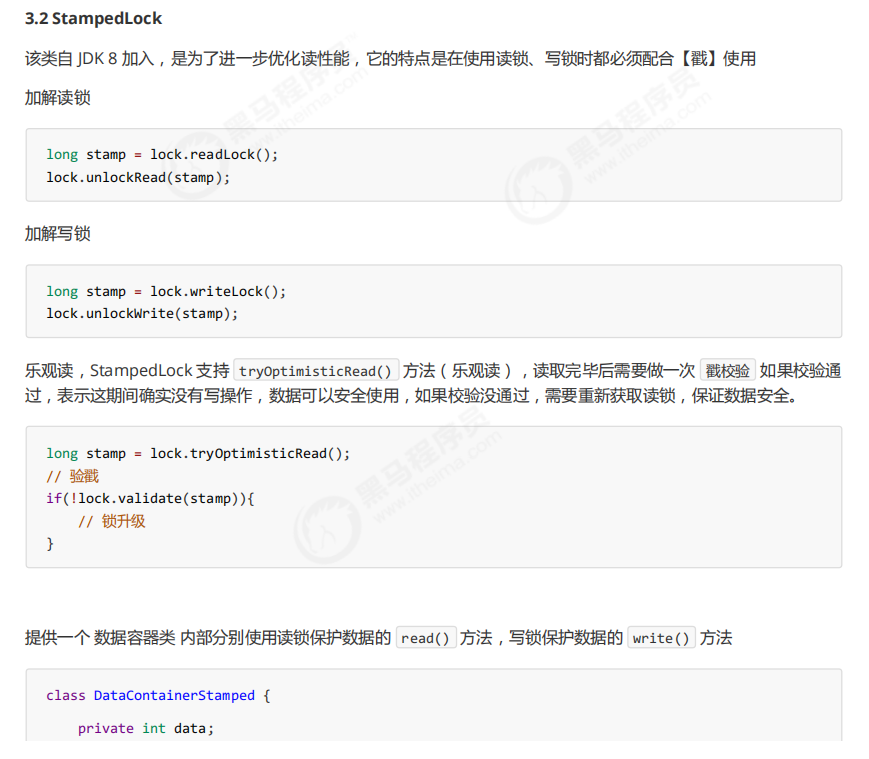
提供一个 数据容器类 内部分别使用读锁保护数据的 read() 方法,写锁保护数据的 write() 方法
package com.example.juc.cn8;

import lombok.extern.slf4j.Slf4j;

import java.util.concurrent.locks.ReentrantReadWriteLock;

@Slf4j
public class TestReadWriteLock {
    public static void main(String[] args) {
        DataContainer dataContainer = new DataContainer();
        new Thread(() ->{
            dataContainer.read();
        },"t1").start();
        new Thread(() ->{
            dataContainer.read();
        },"t2").start();
    }

}
@Slf4j
class DataContainer{
    private Object data;
    private ReentrantReadWriteLock rw = new ReentrantReadWriteLock();
    private ReentrantReadWriteLock.ReadLock r = rw.readLock();
    private ReentrantReadWriteLock.WriteLock w = rw.writeLock();

    public Object read(){
        log.debug("获取读锁");
        r.lock();
        try {
            log.debug("读取");
            Thread.sleep(1000);
        } catch (Exception e) {
            e.printStackTrace();
        }finally {
            log.debug("释放读锁");
            r.unlock();
        }
        return data;
    }

    public void write(){
        w.lock();
        try {
            log.debug("写入");
        } catch (Exception e) {
            e.printStackTrace();
        }finally {
            w.unlock();
        }

    }
}
package com.example.juc.cn8;
import lombok.extern.slf4j.Slf4j;
import java.util.concurrent.locks.ReentrantReadWriteLock;
@Slf4j
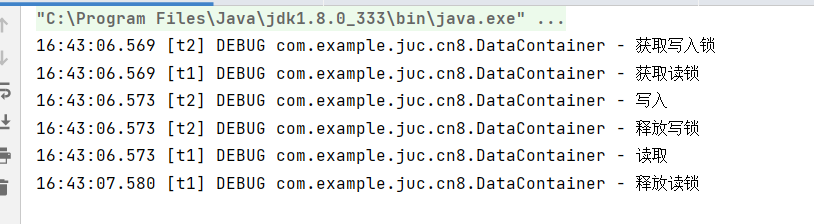
public class TestReadWriteLock {
public static void main(String[] args) {
DataContainer dataContainer = new DataContainer();
new Thread(() ->{
dataContainer.read();
},"t1").start();
new Thread(() ->{
dataContainer.write();
},"t2").start();
}
}
@Slf4j
class DataContainer{
private Object data;
private ReentrantReadWriteLock rw = new ReentrantReadWriteLock();
private ReentrantReadWriteLock.ReadLock r = rw.readLock();
private ReentrantReadWriteLock.WriteLock w = rw.writeLock();
public Object read(){
log.debug("获取读锁");
r.lock();
try {
log.debug("读取");
Thread.sleep(1000);
} catch (Exception e) {
e.printStackTrace();
}finally {
log.debug("释放读锁");
r.unlock();
}
return data;
}
public void write(){
log.debug("获取写入锁");
w.lock();
try {
log.debug("写入");
} catch (Exception e) {
e.printStackTrace();
}finally {
log.debug("释放写锁 ");
w.unlock();
}
}
}
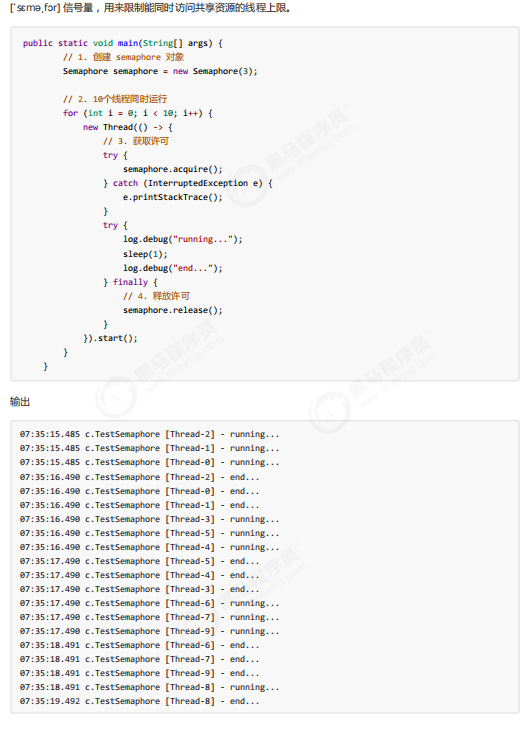
4. Semaphore
基本使用